Tag: maya

Beta

For the last few months I’ve been building my own modular rigging framework and tools. As a very early version, I try to make the UI as simple as possible. There are a few professional projects around. I’ve just added a page Gems to jot them down. Some UIs are quite “stunning” to me. Although rigging could be complicated, I hope I can simplify things unless neccessary.

Here I find the Python Style Guide by Google. I did write years of MEL and it could be hard to manage when it goes over several thousand lines. I’m now learning to refactor codes as frequent as possible to shorten pick-up time.


Disassemble and Rebuild 2

Having subscribed another month of ProRigs in April, there are always little thing to learn. For example, the outsole of a running shoe is usually a bit off the ground. In the past I would see it as pure flat. In their rigs I found that a simple extra set-driven-key is added at the very start during the foot roll. The action is more believable with this tiny detail.

I came across an impressive reel by Mateusz Poplawski https://vimeo.com/mpoplawski This is inspirational on how rig features could be shown in a concise way. Recently I’m checking with the characters by ToyRig www.toyrig.com. Not only they are free, the smearing feature is amazing. Just like some of the rigs some joints and meshes are locked and hidden. So if you want to see them for study purpose, open the file in an editor. Search with the hidden node name. The answer is quite obvious 😀


Custom Marking Menu

Most of the time, I use shortcuts / shelf buttons in Maya to speed things up. Today I went through the tutorial CGCircuit – Rigging Productivity Boost by Carlo Sansonetti. The videos are straightforward. One thing I don’t like is that the setup involves too many manual clicks and depends on Maya’s UI.

I found a post in BindPose which suggests a cleaner way: popupMenu. I think the idea is brilliant and credit goes to Vasil Shotarov. Now I have fewer buttons in my shelf and one more simple way to make life easier in Maya !!!

Disassemble and Rebuild

Giant Man, ProRigs.com

There’s always a lot to learn in other’s rigs. The characters by ProRigs are affordable and the models are nice. The arrangement of attributes is clear and the ribbon setup is well designed.

I would subscribe later for further study since my current month’s subscription is about to end. Time to jump back to previously unfinished tutorials for a clearer picture of rigging a complete character.


Time to Un-learn

Regaining my time, there are long-awaited things I’m going to learn.

Having built several applications with python, I still don’t think I know python well. At the moment I would recommend the course Python for Maya: Beginner to Advanced Rigging Automation by Nick Hughes to beginners. I’ve just skimmed through about 40% of the course. The demo was done in Maya and explanation is thorough. The early parts are mostly basic but I start to find sth useful for better coding. In the past I would write

def f(nameList):
    for name in nameList:
        mc.polyCube(n=name)

f(['a','b'])

Now I could skip the for loop with map function

def f(name):
    mc.polyCube(n=name)
    
list(map(f,['a','b']))

Another one I’d like to share is The Gnomon Workshop – Automating Animation & Game-Ready Rigs by Nick Miller. It’s more advanced and I did fasten my seat belt to learn from him. He is undoubtedly an expert and made things “easy”. The videos are done so next is to study his codes and thought in OOP way.


Soft IK and more

Packing up some maya stuff I done in the past few months and learning 3dsMax for the coming new job.

The soft IK feature is one of many rig features I wanna to implement many years ago. It’s like all other features, not super hard and you could get it once you’re willing to dedicate to figure out what the hell the logic is. I wonder that my method may not be the best and there must be some simpler one . . . https://vimeo.com/168185968

Recently I would recommend the 8 classes of Cartoony Facial Setup by Puppeteer Lounge. They show the use of wire deformer effectively which works well for general cartoony face. For very stylized or detailed cartoony face I might stick with the general joint based method.

And I found an informative post about some recent rigging techniques !
http://www.olivier-ladeuix.com/blog/2016/01/03/so-you-want-to-be-a-rigger-huh-version02/


Maya camera shake

Recently i discover the shake attribute under the camera shape node https://www.youtube.com/watch?v=6AS1PJlcHAE.

In the old days cheating in AE was enough. But it comes up right in time since my aerial shots on hands need plenty of shaking. An easy shaking control in 3d might be better. I use them with expression and custom attributes for keyable magnitude and frequency. To send the shake to 3ds Max my first idea was to bring the shake back to 3d. The shakeHorizontal and shakeVertical values are transferred to tx, ty of an extra locator on top the camera.

The result look fine in general, but not when object goes very far or close. The shake is constant in 2d but not with perspective. Thus I’m thinking about the other method, putting the shake into AE.

I did a quick test and it seems to work. Copy the baked shakeHorizontal and shakeVertical keys of original camera to tx ty of a dummy camera. It should be a locator actually but AE recognizes keys on camera only. Export the dummy camera as .ma and import into AE. Create a null object / solid layer, use expression to get the keys and scale it up about 100 times. Parent any comp to this layer to get the shake.

Not 100% sure but i will tell if it really works.


Pose library

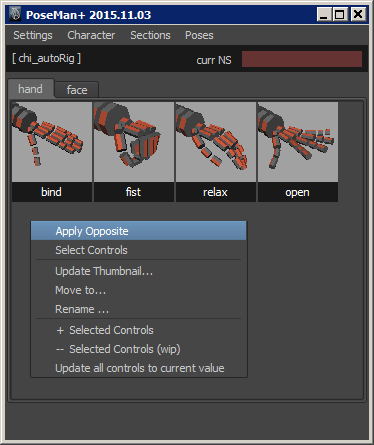
Having a break in the job on hands, I find I need a few more others tools beyond my autorig script to ease my work. Years ago I modified the poseMan script and used it for a while. Actually there are some popular free alternatives with fancy GUI but I like how straight forward it look and use. With time I may rewrite it before messing up the original codes too much.

poseManPlus


Work in Progress

Couple of busy weeks again continuing the rigging of a few characters for a TV commercial. It could be a long page of ideas to share but I’m in a hurry to finish the tasks on hand. Here captured my most recent autorig tool, if someone is interested to see.

chi_autoRigTool_20151018


Weight Painting Tool

I’m trying to do weight painting suggested in the tutorial : Expressive Facial Rigging by Josh Sobel. His workflow involves selection of target vertices, adding weight of 1 to target joint, and applying proper smoothing with unneeded joints locked. Maya’s paint skin weights tool is barely enough so I want more.

  1. Better view of weight assignment.
  2. Quick switching between paint mode and selection mode.
  3. Sliders for quick test on translation / rotation.
  4. Working mirroring even with joints translated / rotated.
  5. Working mirroring even with RHS vertices assigned to LHS joints.
  6. Nice weight relaxation on selected vertices.

The last two weeks I’ve been creating and testing one, with the above (1) to (4) working. The initial idea was from the script sdd_weightTools ( by leifeng ). Feature (5) and (6) are actually nicely done in the script ngSkinTools ( by Viktoras Makauskas ). These two are harder to implement since they may involve python API. Hoping to learn it one day and have these integrated. I already have tons of tools messing around !

weightTool_WIP